WinAmort Professional 2.0

Getting Started - Simple Example

Hide Navigation Pane

Getting Started - Simple Example

Previous topic Next topic No expanding text in this topic  

Getting Started - Simple Example

Previous topic Next topic JavaScript is required for expanding text JavaScript is required for the print function Mail us feedback on this topic!  


A simple example to get started.


The quickest way to learn how to use WinAmort Professional is to quickly work through a simple example, from problem to solution. Then to create a report, print out the report, and finally exporting the data to Excel or Word.


The following are standards the help follows for each form and illustrated examples.


 EXAMPLE


All example problems will be designated with the above illustrated two color blue box.


mouse

icon means you can either use the scroll wheel to carry out a function or use the right click button.

Solve

This solve icon will be followed by the problem or variable to be computed or solved.

action

This action icon will be followed by steps needed to solve the Example question.

ico_lite

Any Tips and Shortcuts to working with WinAmort Pro will be preceded by this light bulb icon.

ico_smile

The smiley face is followed by the solution or answer to the question, when solved.


Lets begin...


Getting Started - Simple Example

Mr. and Mrs. Smith would like to purchased a business for $500,000. They can make a  down payment of $100,000 and will need to finance the rest with a business loan of $400,000 at 5.25%. If they can get the loan, they can close on May 1, 2011 and they will begin to make payments 1 month later on June 1, 2011. The loan Interest will be compounded monthly. They would like to have 6 years to pay off the loan.  Calculate what their monthly payments will be and generate a schedule to present to them and ultimately the bank.


SolveSolve for The Monthly payment amount.


action First of all, select the Fixed Rate form from the list under NEW if you have not already done so.


Fixed Rate Icon


Most Mortgages and Loans with no irregularities can be computed using this form.


When the form appears, ignore the buttons in the Ribbon at the top of the form. Their functions will all be explained as

we work through this example.


For now, lets look at the 15 fields in the middle of the form that you can either choose an entry to enter data in them.


Type


Leave

Leave

Leave

Leave

 
Type


Tip


Tip


Scroll


Type


Tip


Type


Skip


Type


Press


Leave


Click


ico_smile


Tip


Tip


Scroll


Right Click


Click


Mr. and Mrs. Smith's Business Loan in the Title field. This title will appear at the top of the screen when the amortization table is generated.


Simple Example Heading


ico_lite You can use the TAB key or Shift Tab key to jump from one field to the next, or use the mouse to move to the next field.


If you do not understand some of the settings, at the end of the example, you can always go to the specific areas in this Help Guide. But for now by the end of this example, you will have a good understanding of most of the features of WinAmort Professional.
 

For Loan TYPE: the default setting REGULAR.

For Compounded: the default setting MONTHLY.

For Basis Year: the default setting 365 Days.

For Exact day: the default setting No.


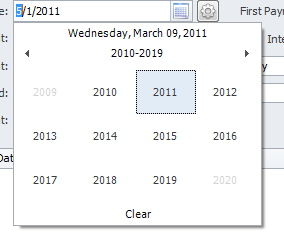
5-1-2011 for the Origination Date. This is the date on which the deal closes and the loan is taken out.


ico_lite To enter the date in faster, click on the Calendar icon beside the field and then select the year, month and date.


Origination Date with Calendar

ico_lite You can click on the Month/Year icon to zoom out and click on the zoomed out months to zoom back in. Try it!


calendar zoom
Zoom out to show 12 months by clicking on May, 2011

Calendar zoom2

Zoom out to show 12 years by clicking on the 2011

Calendar zoom3

Zoom out to show 12 decades by clicking on 2010-2019


mouseYou can also use your mouse scroll wheel to scroll any selected date field. Choose the month and the scroll wheel will increase or decrease the digits up to 12. When it reaches 12, it will go back to 1. This is the same for the days (1-31) and naturally the years will be continuous.


mouse scroll wheelCalendar date scroll The scroll wheel will change the 2011 up or down quickly!


Set the First Payment Date. You can enter it using the calendar button or to quicken the input, if it is one month from the Origination date, then just click the COMPUTE Compute_button button beside the date field.


First Payment Date


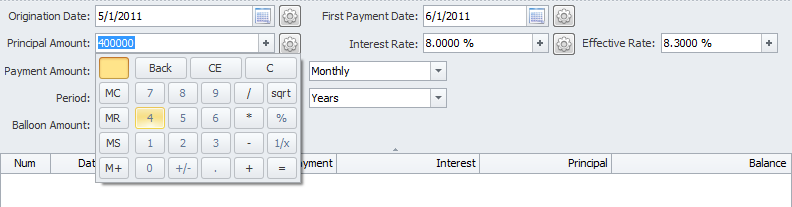
400,000 in the Principal field.


ico_lite You can also enter in any field value by clicking the "+" button beside the field. This will bring up a calculator interface that can be used to enter in any value or carry out a calculation and have the end result entered in to the field.


calculator
ico_liteThe field area becomes the display area of the calculator. So you can enter in 400,000 or you can enter in 500,000 then subtract 100,000 and then click the equal sign to the the value of 400,000. (The memory portion will hold the value as long as the calculator interface is visible.)


5.25 in the Interest Rate field. The interest rate that you enter should always be the annual interest rate.
 
Note: The Effective Rate will automatically be calculated and displayed (see Glossary for definition).

In this case the Effective Rate is calculated to be: 5.3782%


Interest and Effective Rate

The Payment field since this is what we need to compute.


6 in the Period field. (Based on our example they would like to finance for 6 years)


Move the highlight to the field beside the Period field and


the Down Arrow button to select the Period frequency.

Your current options will be ‘YEARS’ or ‘MONTHS’. Select “Years” for this example. If you typed in 300 as the period,

you could select ‘Months’ since 72 months is equivalent to 6 years.


The Balloon Payment amount at zero since we don’t need to use this field for this this example.


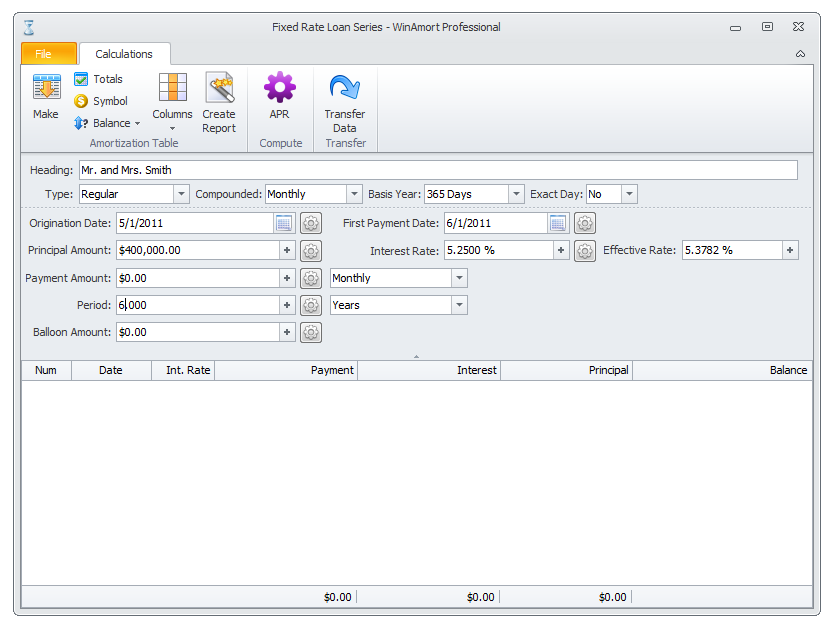
Here is how your form should look at this point:

Simple Example Form
the COMPUTE Compute_button beside the Payment Amount field.


The Monthly payment amount is $6,488.46!


As soon as you click the compute button and the Monthly Payment amount was computed, WinAmort also generated a table below the data entry fields. As illustrated below.


simple table


ico_liteNormally with the form window at its smallest size, 11 lines of the table are viewable. This can easily be expanded by moving your mouse to the bottom of the window and when the icon changes from a pointer to a double sided arrow, click the mouse button and drag it down to increase or decrease the size of the window and ultimately the size of the table.
 
Table stretch

ico_lite Depending on the size and resolution of your monitor, you can stretch it to as long as 44 lines or more. However this is not always necessary, you can just as easily scroll down the table, using the scroll bar on the right hand side of the window or using your Mouse's scroll button.


mouseYou can again use your mouse scroll wheel to scroll up and down the table.


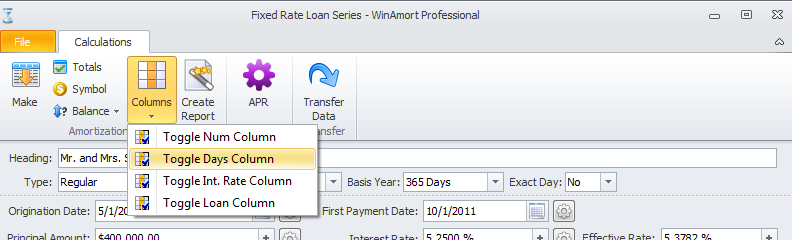
Table features
 

You will notice that the table has 7 columns representing various fields. From the number of the line to the balance. These 7 columns are the default ones shown. You can add or remove some of these columns by selecting:


Column button the column button on the button ribbon at the top of the window.


Column button toggle


When you click the column button you will be able to Toggle four variable columns.


These include:

Numbers column (which is already shown),

Days column (which is not shown),

Interest Rate Column (which is already shown),

Loan Amount column (which is not shown).


If you Toggle On the two missing columns Days and Loan amount, the table will look like the one illustrated below.


Table with additional columns


There are 9 maximum columns on this table.


Other TOP RIBBON buttons.


Fixed Rate Ribbon buttons


The first Make button, generates a new table anytime there is enough data available and you click on it. The other three

vertical buttons next to Make are explained below.


Totals_Symbols_Balance Button

Totals button - Toggles the Running Totals row below the table. You can either have it visible or hidden.

Currency Symbol button - Toggles on or off the currency symbol in the table.

Balance Button - Allow you to altered the table to have the either the last payment or last interest amount adjusted to Zero the final balance.


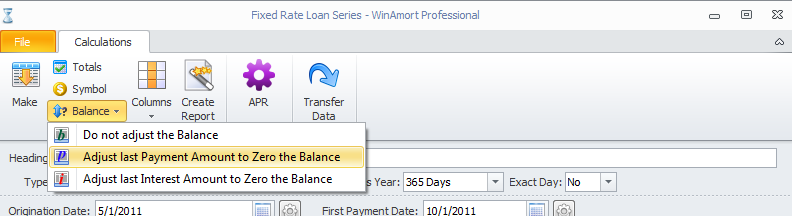
When you click on the Balance button a small window will pop-up.
 

Balance Adjustment


mouseYou can access this same three Balance adjustment options as well as the Currency Toggle by right clicking any line in the table. This will pop up a window with similar options as well as the option to clear the table.


clear table


Column button Columns button - we already showed, toggles on and off 4 of the columns out of a possible 9.

Create Report Button Create Report button - allow you to customize output variables of your table and then once generated,

you can view it, save it, print it out or export the the entire schedules or any part of it in various formats.


Lets output our Simple Example Table.


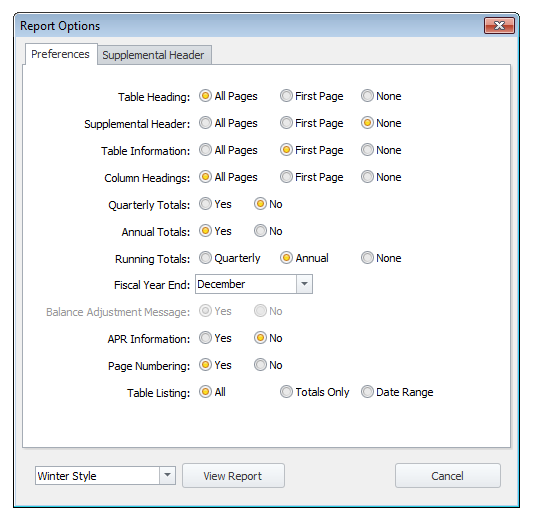
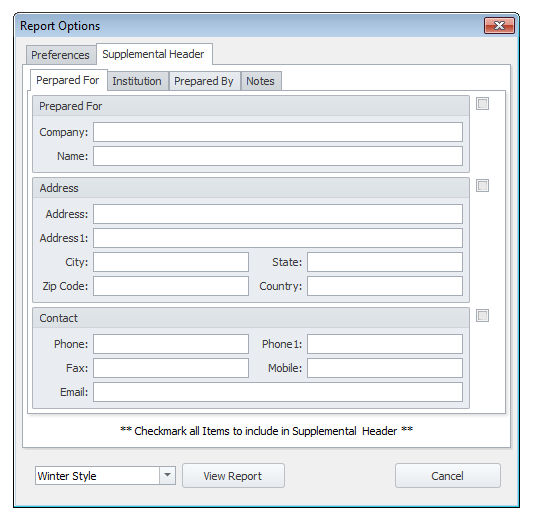
Create Report button. The following window will appear.


Report Options Window

All of the 12 rows of options are explained below.


Table Heading

The Table Header consists of the Schedule Heading in this case Mr and Mrs. Smith's Business Loan.

You can print this header on all pages, only on the first page or not at all.


Supplemental Header

The Supplemental Header will allow you to print the information about:


Whom the schedule has been prepared for.
The financial institution involved.
Who prepared this schedule.
Any additional notes that you may wish to add.


In order to input any or all of this data, you have to select the Supplemental Header tab at the top of the Report Options window. When you select it the Windows will show the additional fields.

Supplement Header window

ico_liteRemember to check the   Checkbox  check box beside any of the input fields that you want to be printed.

If you do not check the check box, the information in the fields will not be printed on the schedule.


Table Information

This will print the the variable information from the Fixed Rate form you used to generate the schedule. This includes the following.


Series Type:

Regular

Compounded:

Monthly

Loans:

$400,000.00

Start Date:

May 01, 2011

Basis Year:

365 Days

Interest:

$76,817.60

Time Span:

6.333 Years

Exact Day:

No

Payments:

$476,817.60


Printing options include: Print header on all pages, only on the first page or not at all.


Column Headings

Column headings are the heading for each of the columns on the table.

Printing options include: Print header on all pages, only on the first page or not at all.


Quarterly Headings

Quarterly Subtotals are totals that are calculated after every three months. The three month interval starting and ending months depend on the setting of the Fiscal Year End.

Your can turn these totals On or Off.


Annual Totals

Annual Totals are the annual payment, principal and interest totals. They can be printed by leaving the Option On or not printed by selecting the Off option.


Running Totals

Running Totals keep track of the payments, principal and interest totals to date. These totals can be printed Quarterly or Annually. The totals can be turned off by selecting NONE option.


Fiscal Year End

Fiscal year end allows you to set the month after which the annual totasl are to be calculated.


Balance Adjustment Message

The generated table can be altered to have the either the last payment or last interest amount adjusted to Zero the final balance. If you choose this option by clicking on the balance button, this entry will be active.


Your options are to print the Balance adjustment message on the schedule or leave it off.

APR Information

The Annual Percentage Rate for Truth in Lendings Act and Regulation Z can be printed out.

Page Numbering

Page number for multiple page schedules can be turn On or Off.

Table Listing

Table listing option allows you to print out the entire schedule with all of the selected variable shown above, or you can choose to print on the Totals or Date Range.


If you select Totals only - The printed schedule will only print the annual Totals and Running Totals. An example is illustrated below.


Totals Only


Date Range option, you can print out any range of the schedule by date. Example: Between May 1, 2011 and September 12, 2013.


Printing out the schedule

Once you select all of the options you would like to include or exclude from the Report, you can choose the style of your report.


The options include:

Winter

Light Blue


Summer

Green


Spring

Light Violet


Fall

Light Orange


Grey

Grey


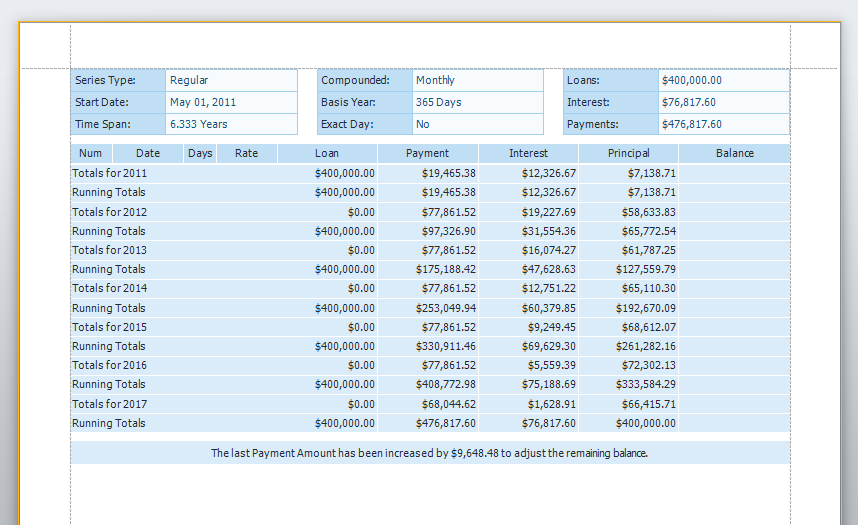
The first page of the Winter theme report is as follows:


Simple Example Schedule


This concludes the simple example. Try a few example calculations, once you understand how WinAmort Pro is designed

to work, move to the Form Types and work through a few of the examples in the Fixed Rate and Irregular Payment and

Investment forms and you will have mastered using WinAmort Professional.


This ends the Simple Example Question. All of the forms can be used in a similar way. The tips and scrolling capabilities also

are the same. Also, try the other examples under the appropriate headings.


The report viewer enables you to see a soft copy of the entire schedule without printing it out. This saves paper, costs and protects the environment.

The report viewer has many options and can even export or email the generated schedule in different formats, including Excel and Word.